Category Archives

67 Articles

Posted by Anna Brandt on

Collaboration – Versions Management

Release 1.7.1

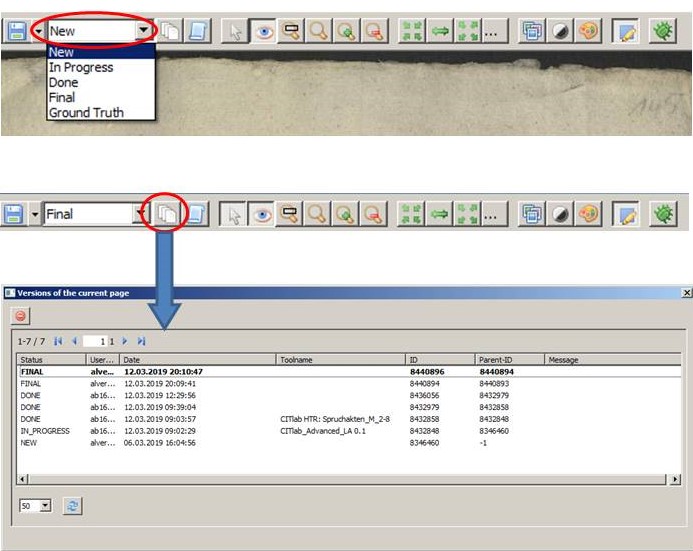
The second important element for organized collaboration is the version management of Transkribus. In the toolbar it seems rather inconspicuous, but it is enormously important. Transkribus stores a version of the currently edited page each time it is saved. It contains the current status of the layout work and content processing.

These versions are provided with an “edit status” so that they can be easier distinguished. A newly uploaded Document contains only pages with the edit status “new”. As soon as you edit a page, the edit status automatically changes to “in progress”. The three other status options – “done”, “final” and “Ground Truth” – can only be set manually.

The logical time to set such a “higher” status depends on the agreements within the team. We use versions management mostly during the production of training material – Ground Truth. All pages that have a finished layout analysis are set to “done” so that the transcribers and editors know that this page can now be finished by them. This status will not be changed until the page has a 100% secure transcription. Then it will be set to “Ground Truth” or “final”. All pages with the status “GT” will later be used as training material for HTR models, while the pages with edit status “final” will be used to create the test sets.

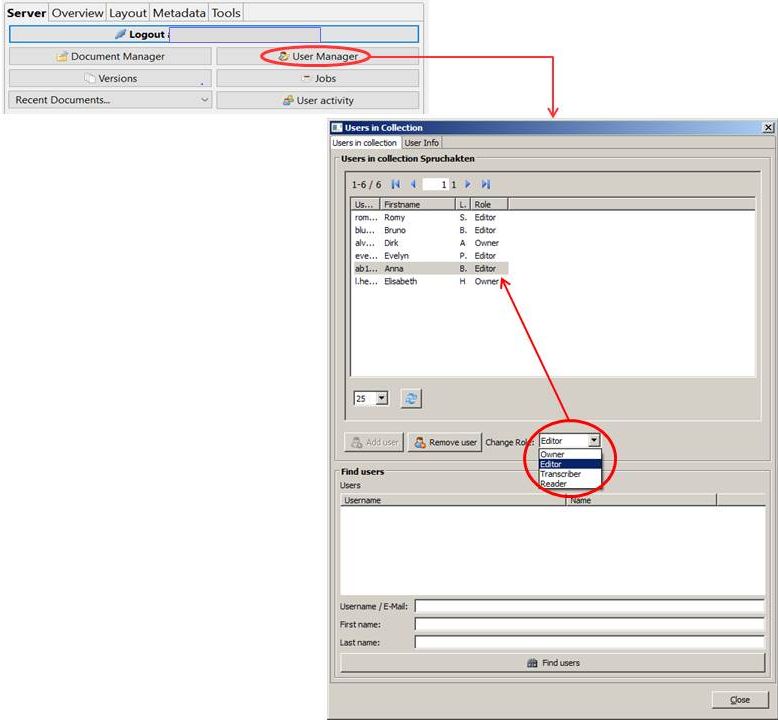
Each collaborator can access and edit or delete all versions of a page at any time. The edit status helps him to find the desired version faster. In addition to the edit status, the last editor and the save time are displayed for each version. If the version was edited with an automatic process (layout analysis or HTR), this is also commented. Thus, the processing steps are traceable in detail.

Tips & Tools
You can have multiple versions with the same status.
You can set any version to any other status – except to “New”.
You can delete single or multiple versions – except final versions, which cannot be deleted.

Posted by Elisabeth Heigl on

The more, the better – how much GT do I have to put in?

Release 1.7.1

As I said before: Ground Truth is the key factor when creating HTR models.

GT is the correct and machine-readable copy of the handwriting that the machine uses to learn to “read”. The more the machine can “practice”, the better it will be. The more Ground Truth we have, the lower the error rate.

Of course, the quantity always depends on the specific use case. If we work with a few, easy-to-read writing, little GT is usually enough to train a solid model. However, if the writings are very different because we are dealing with a large number of different writers, the effort will be higher. This means that in such cases we need to provide more GT to produce good HTR models.

In the Spruchakten we find many different writers. That’s why a lot of GT was created to train the models. Our HTR-models (Spruchakten_M_2-1 to 2-11) clearly show how quickly the error rate actually decreases if as much GT as possible is invested. We can roughly say that doubling the amount of GT in training (words in trainset) will halve the error rate (CER page) of the model.

In our examples we could observe that we have to train the models with at least 50,000 words of GT in order to get good results. With 100,000 words in training, you can already create excellent HTR models.

Posted by Anna Brandt on

Train sets & test sets (for Beginners)

Release 1.7.1

When we train an HTR model, we create training sets and test sets, all based on Ground Truth. In the next posts on this topic you will learn more about it, especially that both sets must must not be mixed together. But what exactly is the difference between the two and what are they used for?

Training and test sets are very similar in the choice of material they contain. The material in both sets should come from the same handwritings and be at the same status (GT). The difference is how Transkribus uses it to create a new model: The training set is learned by the program in a hundred (or more) rounds (epochs). Imagine writing a test a hundred times – for practice purposes, so to speak. Every time you write the test, after going through all the pages, you get the solution and can look at your mistakes. Then you start again with the same exercise. Of course you’ll get better and better. The same way does Transkribus learn a bit more with each pass.

After each round in the training set, the learned skills are checked on the test set. Imagine your test again. This time you write the test, get the grade, but they don’t tell you what you did wrong. So Transkribus goes through the same pages many times, but can never see the right solution. The model has to fall back on the previously learned training and you can see how well it has studied.

So if there were the same pages in the test set as in training, Transkribus could “cheat”. It would already know the pages, have practised on them a hundred times and seen the solution a hundred times. This is the reason why the CER (Character Error Rate) in the training set is almost always lower than in the test set. This is best seen in the “learning curve” of a model.

Posted by Elisabeth Heigl on

Collaboration – User Management

Release 1.7.1

The Transkribus platform is designed for collaboration. So many users can work on a collection and even a document at the same time. Collisions should be easily avoided with a little organizational skill.

The two most important elements enabling organized collaboration are User Management and Version Management in Transkribus. User Management refers explicitly to the collections. The person who creates a collection is always its “owner”, meaning that he has full rights, including the right to delete the entire collection. He can grant other users access to the collection and assign them roles that correspond to different rights:

Owner – Editor – Transcriber

It is wise if more than one member of the team is the “owner” of a collection. All the rest of us are “editors”. Assigning the role “transcriber” is especially useful if you run crowd-projects where volunteers do nothing but transcribe or tag texts. For such “transcribers”, access via the WebUI, with its range of functions adapted to this role, is ideally suited.

Posted by Anna Brandt on

Toolbar – the most important tools and how to use them #2

Release 1.7.1

Correcting layouts

If the basic text regions are drawn, they can be edited. If you select one of the text regions, the other tools on the toolbar will be enabled.

With 1 you can add one or more points to the selected shape (TR or BL!). All shapes consist of dots and straight lines connecting them. You can edit the shape by moving the dots. You can use this tool to make a polygon out of the basic text region, whatever fits best to the text block. Press 2 to remove a dot from the selected shape. This tool is especially useful for correcting or shortening baselines.

This is especially useful if you have split elements. With 3,4 and 5 it is possible to cut a selected shape. This is also possible for both text regions and baselines: 3 cuts horizontally, 4 vertically. With 5 you draw your own line, which does not necessarily have to be horizontal or vertical.

The last important tool (red circle) is the Merge tool. This is especially important if the automatic LA has split baselines in the image. You can  use Merge to reassemble all shapes. So baselines with baselines and text regions with text regions. To do this you have to mark the corresponding shapes, which you can do directly in the image or in the layout tab.


Tips & Tools
When splitting, note that the TR and BL can only be cut where they have lines. It is not possible to cut through the dots.
Be aware that when you split a shape Transkribus will automatically change the Reading Order. For example, if two TRs are made from one, a new reading order is started in each TR.

Posted by Anna Brandt on

Reading Order

Release 1.7.1

The Reading Order displays the order in which the HTR will read the lines in an image. This RO is created automatically during the layout analysis, but can also be changed manually later. With the automatic LA, the RO is determined by the coordinates of the lines in the image: the top line, which is furthest to the left, is number one, and so on.

If the writing in the image is not completely horizontal or if baselines are split, this can cause errors in the Reading Order. If you correct the LA, you should always look at the RO again, otherwise the transcribed text gets confused and makes little sense. To change the RO you can either click on the circles at the lines where the line numbers appear and correct them directly. Or you can change the RO by selecting the corresponding line in the layout tab and moving it with the mouse. If the later full text is to make sense at first glance, such corrections are essential. After all, the RO determines the context of the content. If the HTR-Result of the document is only to be used for a full text search and is not to be displayed in structured full text, the RO is less relevant.


Tips & Tools
If you want to move a line forward or backward, the numbers of the following lines will change automatically. Sometimes it is necessary to calculate a bit beforehand which number will be the correct one.
Very important: When the author writes an increasing line from left to right – which happens very, very often – and when the baseline is split on the LA, the second half of the split BL will have the smaller number. If you want to merge these baselines with the Merge Tool, you have to look at the RO first. If the RO is wrong, Transkribus will merge it with a loop according to their coordinates. This baseline can no longer be interpreted by the HTR.
Edit: This problem was solved with the version 1.8.0. The problem now only occurs with vertically recognized lines.

Posted by Anna Brandt on

Toolbar – the most important tools and how to use them #1

Release 1.7.1

Creating Layouts

This is how the toolbar looks like with a new image. After you have run the CITlab Advanced LA, the other tools will be enabled. If the layout is to be done manually, the two tools in the upper circles are particularly important. TR means text region. This is the first layout element that has to be created for a page. It defines which areas of the image have text and which do not. If the text does not fit correctly into a text region, you first roughly draw the TR and later adjust it. Then you can draw the baselines with “BL”. Among the lower tools, only the green, semicircular arrow is important. This is the “undo”-function; as the name suggests, it is used to undo actions.

Tips & Tools
“Item visibility” is a function that makes structure of the document more transparent for you. If it is enabled, a box appears in which you can select what items should be visible in the current image. Textregions and Baselines are the most important elements, not only while editing the layout, but also during the later transcription. These two boxes are always checked in the default setting. If the display of the Baselines annoys you, you should deactivate it manually. Another important feature for correcting the layout is the Lines Reading Order, i.e. the order in which the lines are read later by the HTR. When the Reading Order is displayed, you can easily see whether the layout analysis has worked reliably. However, this display is mostly distracting while transcribing. In this case you should hide it again.

Posted by Anna Brandt on

Baselines

Release 1.7.1

The Baseline is the most important reference point for text recognition. The segmentation of a text into lines can in most cases be done automatically with the help of CITlab Advanced LA. However, there might be cases where you either immediately decide to draw the baselines manually or at least want to make manual corrections. Here are a few practical tips:
The baseline should always be positioned exactly under the “middle band” of the line, i.e. where “a” “o” “m” “v” etc. touch the base.
If you add the baseline manually which you can do very quickly with a little practice, you should never move too far from the bottom of the characters (not further than one or two linewidths of the writing) no matter in which direction. The baseline consists of individual points that you set yourself when adding manually; the setting is completed with a double-click or Enter on the last point. Baselines can also be drawn vertically. In an image and even a text region, you can also combine different line directions (e.g. the typical “postcard layout”).

Problems with automatic line detection occur frequently when either the word spacing varies significantly or becomes particularly large, or if the line orientation is changed (curved lines). In such cases, the Baseline may be split into subsections containing individual words. This has no consequences for the text recognition and thus for the later full text search, because the entire text can still be captured. However, those who value a perfect layout of their full text that reflects the original text must correct this. The correction of the Baselines is not always necessary, but you have to pay attention to the Reading Order, otherwise uncertainties may arise in the later transcript. Such “torn” Baselines can be merged again easily with the Merge-Tool.


Tips & Tools
What if the text is upside down?
The CITlab Advanced LA cannot correctly capture the Baseline of an upside down line. Baselines always work in the reading direction. If you want to detect upside-down lines or set them manually, you either have to rotate the image or draw the Baseline at the top of the middle band (against the reading direction) from right to left. In both cases, Transkribus will rotate the image during transcription in the readable direction.

Posted by Anna Brandt on

What you should know about Collections & Documents

Release 1.7.1

Collections and Documents are the two most important categories in which you can organize and manage material in Transkribus. A Collection is nothing else than a kind of directory in which you store Documents that belong together. It is important to know that some tools that Transkribus provides do not work beyond the boundaries of a Collection. This includes a tag search, which is an important tool for those who want to tag their HTR results.
Documents are parts of the Collection, e.g. a bundle of letters or a record or even
a single piece of writing. In our project a Document is always a record. Documents can therefore contain many pages. They usually are uploaded into Transkribus via private FTP or directly from a local folder. You cannot upload single images, but only images that are contained in a folder.

Once uploaded, the possibility to edit the individual pages of a Document is limited. Using the document manager, you can move or delete individual pages within the Document, you can even add more pages. However, once images are uploaded, they can no longer be edited or rotated. This means: before uploading you should check if the images are aligned correctly and if the Document is complete.
Thus in our project, Documents are only compiled and uploaded once they have been edited in the Goobi metadata editor, checked for completeness and received structure and metadata. This ensures that when the HTR results are re-imported to Goobi later, they are actually transferred to an identical document structure.


Tips & Tools
Documents can be distributed between different Collections at any time. This is done by linking or duplicating. In the first scenario, each change to the Document, no matter in which Collection it is made, is transferred to all Collections it is linked to. The second scenario creates actually two unique Documents that can also be edited independently of each other.

Posted by Anna Brandt on

Textregions

Release 1.7.1

Usually, the automatic CITlab Advanced Layout Analysis in its standard setting will recognize a single Text Region (TR) on an image with the corresponding baselines.
However, there are also simple layouts where the use of several TRs is recommended, e.g. if there are marginal notes or footnotes and similar recurring elements. As long as these text areas, which differ in content and structure, are contained in a single TR, the layout analysis simply counts the lines from top to bottom.

This “Reading Order” does not take into account where a text actually belongs in terms of content (e.g. an insertion), but only where it is graphically located on the page. Correcting an automatically generated but unsatisfactory Reading Order is boring and often time-consuming. The problem can easily be avoided by creating several text regions in which the related texts and lines are well kept like in a box.
To do this, you create the TRs manually at the appropriate places. Afterwards start the line detection with CITlab Advanced to add the baselines automatically.

Tips & Tools
If you have drawn the TRs manually and want to have the baselines drawn automatically by CITlab Advanced LA, you should first uncheck the box “Find Textregions”. Otherwise the manually drawn TRs will be replaced immediately. You should also make sure that none of the individual text regions is activated, otherwise only these will be edited.