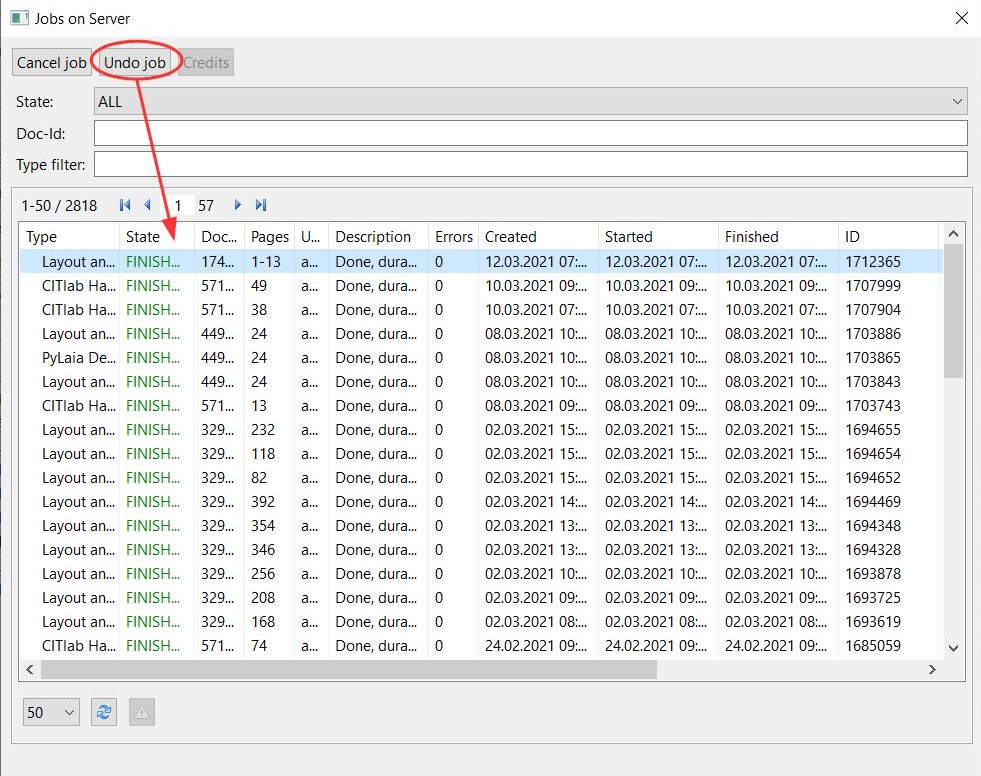
Anna Brandt


Posted by Anna Brandt on

Region Grouping

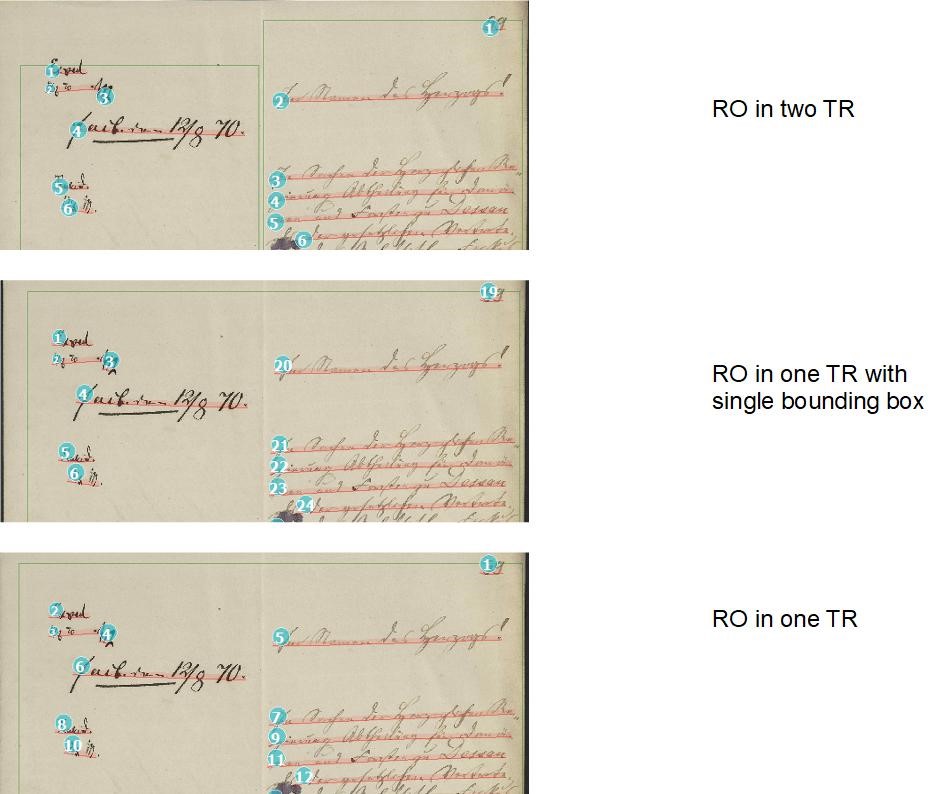
Since the version update 1.14.0 there is a new function to configure the layout analysis. It is about the arrangement of the text regions, called ‘Region grouping’. Now you can configure if they should be grouped around baselines or if all lines should be in one TR.

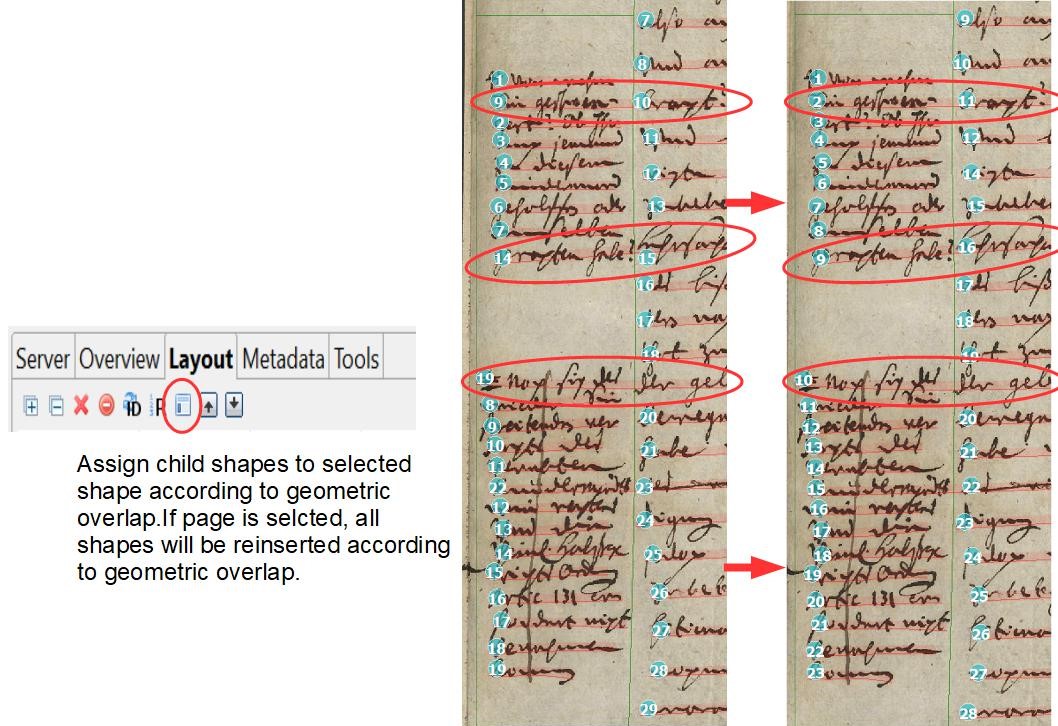
With the first mentioned setting it can happen that many small TRs appear at the edge of the image or in the middle of it, even if there is actually only one text block. This problem can be solved in a further step with the Remove small Textregions.

On the other hand, if only one text region is set, really all baselines are in this text region, even those that are otherwise marginal and even vertical BL. As long as the setting ‘Heterogeneous’ is selected for ‘Text orientation’, the layout analysis also recognizes the vertical lines in the same TR with the horizontal ones. It can be seen that the LA would normally recognize multiple TR. In fact, the reading order for the lines is still divided as if they were in their own text regions. The main paragraph is usually TR 1, so the RO starts there. The other baselines are placed at the back, even if they are at the side of the main text and could therefore be placed between them.

To decide which setting is better for you, you have to try it out. For pages that have only one text block, the second setting is of course advantageous, because all the small TR do not appear. It could also be that you have to choose different settings within one document.

Posted by Anna Brandt on

Undo Job

Version 1.14.0

Since version 1.12. there is a practical tool to correct careless mistakes. It has certainly happened to some of you that you have started a large job in a document and then realize that the parameters were set incorrectly or that you did not want to run this job at all. This could be a layout analysis or an HTR with the wrong model. To fix such errors quickly and easily, especially if they affect several pages, the function ‘Undo Job’ was added to the job list window. With this you can delete a whole job that has gone wrong.

If, for example, a layout analysis has run on pages that were already finished because you forgot to set the checkbox to ‘Current Page’ (a mistake that happens often). Then you don’t have to select each page individually and delete the wrong version, but you can simply undo the whole job with this function.

This only works if the job is the last version you created on the pages. If another version is the last one, then Transkribus will show that and the job will not be deleted on that page. On the pages where the job is the last version it will be deleted.This means that you can continue working first and then just delete the version created by the wrong job on the pages where it should not run (e.g. GT), while it remains on the pages you have continued working on.


Tips & Tools
1) Even if the job is deleted on all pages, it does not disappear from the list of executed jobs. So you should always check one/two pages again to be sure.
2) It works only if you are in the document where the job was executed.

Posted by Anna Brandt on

Searching and editing tags

Release 1.11.0

If you tag large amounts of historical text, as we have tried to do with place and person names, you will sooner or later have a problem: the spelling varies a lot – or in other words, the tag values are not identical.
Let’s take the places and a simple example. As “Rosdogk”, “Rosstok” or “Rosdock” the same place is always referred to – the City of Rostock. To make this recognizable, you use the properties. But if you do this over more than ten thousand pages with hundreds or thousands of places (we set about 15,000 tags for places in our attempt), you easily lose the overview. And besides, tagging takes much longer if you also assign properties.

Fortunately, there is an alternative. You can search in the tags, not only in the document you are working on, but in the whole collection. To do this, you just have to select the “binoculars” in the menu, similar to starting a full text search or KWS, only that you now select the submenu “Tags”.

Here you can select the search area (Collection, Document, Page) and also on which level you want to search (Line or Word).Then you have to select the corresponding tag and if you want to limit the search, you have to enter the tagged word. The search results can also be sorted. This way we can quickly find all “Rostocks” in our collection and can enter the desired additional information in the properties, such as the current name, geodata and similar. These “properties” can then be assigned to all selected tagged words. In this way, tagging and enrichment of data can be separated from each other and carried out efficiently.

The same is possible with tags like “Person” or “Abbrev” (where you would put the resolution/expansion in the properties).

Posted by Anna Brandt on

Tagging in WebUI

For tasks like tagging already transcribed documents, the WebUI, which is especially designed for crowd sourcing projects, is very well suited.

Tagging in the WebUI works slightly different than in the Expert Client. There are different tools and settings.

If you have selected your collection and the document in the WebUI and want to tag something, you have to select “Annotation” and not “plain text” for the page you want to edit.  Both modes are similar, except that in Annotation you can additionally tag. To do this, you need to select the words and right-click on them to pick the appropriate tag. Always save when you leave the page, even if you switch to layout mode. The program doesn’t ask you to save the tag as it does in the Expert Client and without saving your tags will be lost.

All tags appear to the left of the text field when you click on the word. The tags set in the Expert Client are also displayed there. The whole annotation mode is still in a beta version at the moment.

Posted by Anna Brandt on

Tagging Tools

Release 1.11.0

In a previous post we already wrote about our experiences with structure tagging and described the tools that go with it. But for most users (e.g. in edition projects) enriching texts with additional content information is even more important. To add tags to a transcription you can use the tagging tools in the tab “Metadata”/”Textual” in Transkribus.

Here you can see the available tags as well as those that have already been applied to the text of the page. With the Customize button you can create your own tags or add shortcuts to existing tags, just like with structure tagging. The shortcuts allow for easier and faster tagging in the transcript. If you want to do without shortcuts, you have to mark the respective words in the text (not in the image) and select the desired tag with a right click. Of course a word can be tagged several times.

These tags should not be confused with the so-called TextStyles (for example, crossed out or superscript words). They are not accessible below the tags but via the toolbar at the bottom of the text window.

Posted by Anna Brandt on

Transcribing without layout analysis?

Release 1.10.1

We have emphasized in previous posts how important LA is. Without it, an HTR model, no matter how good it is, has no chance of transcribing a text properly. The steps of automatic LA (or a P2PaLA model) and HTR are usually initiated separately. Now we noticed that when an HTR model runs over a completely new or unedited page, the program automatically executes an LA.

This LA runs with the default settings of CITLab-Advanced LA. On pure pages, fewer lines have to be merged and sometimes more than one text region is recognized.

But it also means that only horizontal text is recognized. We had the same problem with our P2PaLA models. Everything that is slanted or vertical cannot be recognized this way. To do this, the LA must be initiated manually, with the setting ‘Text Orientation’ set to ‘Heterogeneous’.

Interestingly, the HTR results are better with this method than with an HTR that has been run over a corrected layout analysis. We have calculated the CER for some pages to show this.

Thus this method is a very good alternative, especially for pages with an uncomplicated layout. You save time, because you only have to initiate one process, and in the end you have a better result.

Posted by Anna Brandt on

Tools in the Layout tab

Release 1.10.

The layout tab has two more tools, which we did not mention in our last post. They are especially useful for correcting the layout and save you from annoying detail work.
The first one corrects the Reading Order. If one or more text regions are selected, this tool automatically arranges the child shapes, in this case the lines and baselines, according to their position in the coordinate system of the page. So the reading order starts at the top left and continues counting from there to the bottom right.  In the example below, a TR was split but the RO of the marginal notes got mixed up. This tool saves you now from renaming each BL individually.

The second tool (“assign child shapes”) helps to assign the BL to the correct TR. This can happen when cutting text regions or baselines that run through multiple TRs. Each BL then has to be marked in the layout tab and moved to the correct TR. For assigning them automatically to the corresponding TR you just select the TR where the BLs belong to and start the tool.

Posted by Anna Brandt on

P2PaLA – line detection and HTR

Release 1.9.1

As already mentioned in a previous post, we noticed in the course of our project that the CITLabAdvanced-LA does not optimally identify the layout in our material. This happens not only on the ‘bad’ pages with mixed layouts, but also on simple layouts, i.e. on pages without any marginalias at the edge, great deletions in the text or similar. Here the automatic LA recognizes the TR correctly, but the baselines are often faulty.

This is not only confusing when the full text is displayed later; an insufficient LA also influences the result of the HTR. No matter how good your HTR model is: if the LA does not offer adequate quality, it is a problem.

The HTR does not read the single characters, but works line based and should recognize patterns. But if the line detection did not identify the lines correctly (in case letters or words were not recognized by the LA) this often produces wrong HTR results. This can have dramatic effects on the accuracy rate of a page or an entire document, as our example shows.


1587, page 41

For this reason we have trained a P2PaLA model which also detects BLs. That was very helpful. It is not possible to calculate statistics like CERs for these layout models, but from the visual point it seems to work almost error-free on ‘simple’ pages. In addition, a postprocessing is no longer necessary in many cases.

The training material for such a model is created in a similar way to models that should recognize TRs only. The individual baselines do not have to be tagged manually for the structural analysis, even if the model does so later in order to assign them to the tagged TR. With the support of the Transkribus team and a training material of 2500 pages, we were able to train the structural model that we use today instead of the standard LA.

Posted by Anna Brandt on

P2PaLA – Postprocessing

Release 1.9.1

Especially at the beginning of the development of a structure model, it occurred to us that the model recognized every irregularity in the layout as a TR. This leads to excessive – and unnecessary – many text regions. Many of these TRs were also extremely small.

The more training material you invest, the smaller the problem. In our case these mini TRs disappeared, after we had trained our model with about 1000 pages. Until then, they are annoying because removing them all by hand is tedious.

To reduce this labour you have two options. Firstly, starting the P2PaLA you can determine how large the smallest TR is allowed to be. For this you have to select the corresponding value in the “P2PaLA structure analysis tool” before starting the job (“Min area”).

If this option does not bring the expected success, there is the option “remove small textregions”. You will find this on the left toolbar, under the item “other segmentation tools”. In the menu you can set the pages on which the filter should run as well as the size of the TR to be removed.  The size is calculated in “Threshold percentage of image size”. Here the value can be calibrated finer than with the above mentioned option. If the images, as with our material, often have small notes, for example the marginalias where there is only a single word in a TR, then the smallest or second smallest value possible should be chosen. We usually use the “Threshold percentage” of 0.005.

Even with a good structural model, it may still be possible that individual TRs have to be manually merged, split or removed, but to a much lesser extent than the standard LA would require.

Tips & Tools
Important: If you want to be sure that you don’t remove too many TRs, you can start with a “dry run”. Then the number of potentially removable TRs will be listed. As soon as you uncheck the box, the affected TRs will be deleted immediately.

Posted by Anna Brandt on

P2PaLA – Training for Textregions

Release 1.9.1

At another place of these blog you can find information and tips for structure tagging. This kind of tagging can be good for a lot of things – the following is about its use for an improved layout analysis. Because structure tagging is an important part of training P2PaLA models.

With our mixed layouts the standard LA simply had to fail. The material was too extensive for a manual creation of the layout. So we decided to try P2PaLA. For this we created training material for which we selected particularly “difficult” but at the same time “typical” pages. These were pages that contained, in addition to the actual main text, comments and additions and the like.


coll: UAG Strukturtagging, doc. UAG 1618-1, image 12

For the training material only the correctly drawn and tagged text regions are important. No additional line detection or HTR is required. However, it doesn’t bother either, so you can include pages that have already been completely edited in the training. However, if you take new pages on which only the TR has to be drawn and tagged, you’ll be faster. Then you can prepare eighty to one hundred pages for training in one hour.

While we had tagged seven different structure types with our first model, we later reduced the number to five. In our experience, a too strong differentiation of the structure types has a rather negative effect on the training.

Of course, the success of the training also depends on the amount of training material you invest. According to our experience (and based on our material) you can make a good start with 200 pages, with 600 pages you get a model you can already work with; from 2000 pages on it is very reliable.

Tips & Tools
When you create the material for structure training, it is initially difficult to realize that this is not about content. That means no matter what the content is, the TR in the middle is always the paragraph. Even if there is only one note in the middle and the concept is much longer and more important. This is the only way to really recognize the necessary patterns during training.