Monthly Archives

10 Articles

Posted by Anna Brandt on

Toolbar – the most important tools and how to use them #2

Release 1.7.1

Correcting layouts

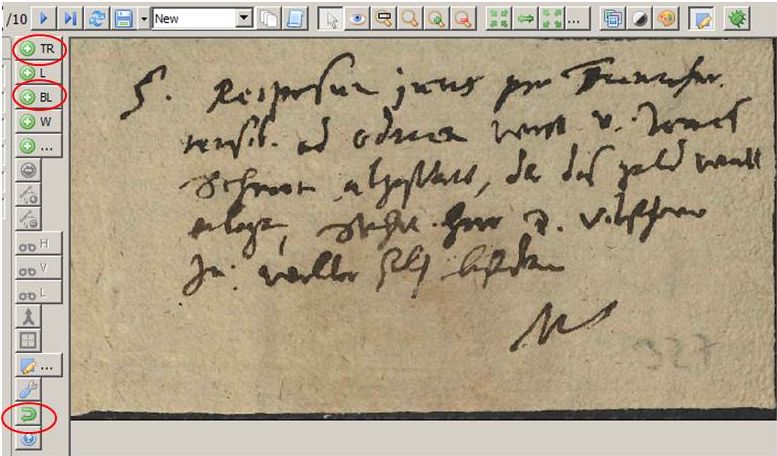
If the basic text regions are drawn, they can be edited. If you select one of the text regions, the other tools on the toolbar will be enabled.

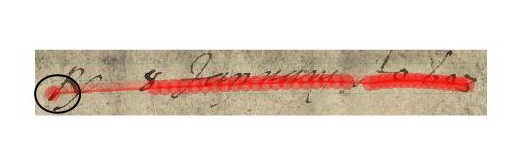
With 1 you can add one or more points to the selected shape (TR or BL!). All shapes consist of dots and straight lines connecting them. You can edit the shape by moving the dots. You can use this tool to make a polygon out of the basic text region, whatever fits best to the text block. Press 2 to remove a dot from the selected shape. This tool is especially useful for correcting or shortening baselines.

This is especially useful if you have split elements. With 3,4 and 5 it is possible to cut a selected shape. This is also possible for both text regions and baselines: 3 cuts horizontally, 4 vertically. With 5 you draw your own line, which does not necessarily have to be horizontal or vertical.

The last important tool (red circle) is the Merge tool. This is especially important if the automatic LA has split baselines in the image. You can  use Merge to reassemble all shapes. So baselines with baselines and text regions with text regions. To do this you have to mark the corresponding shapes, which you can do directly in the image or in the layout tab.


Tips & Tools
When splitting, note that the TR and BL can only be cut where they have lines. It is not possible to cut through the dots.
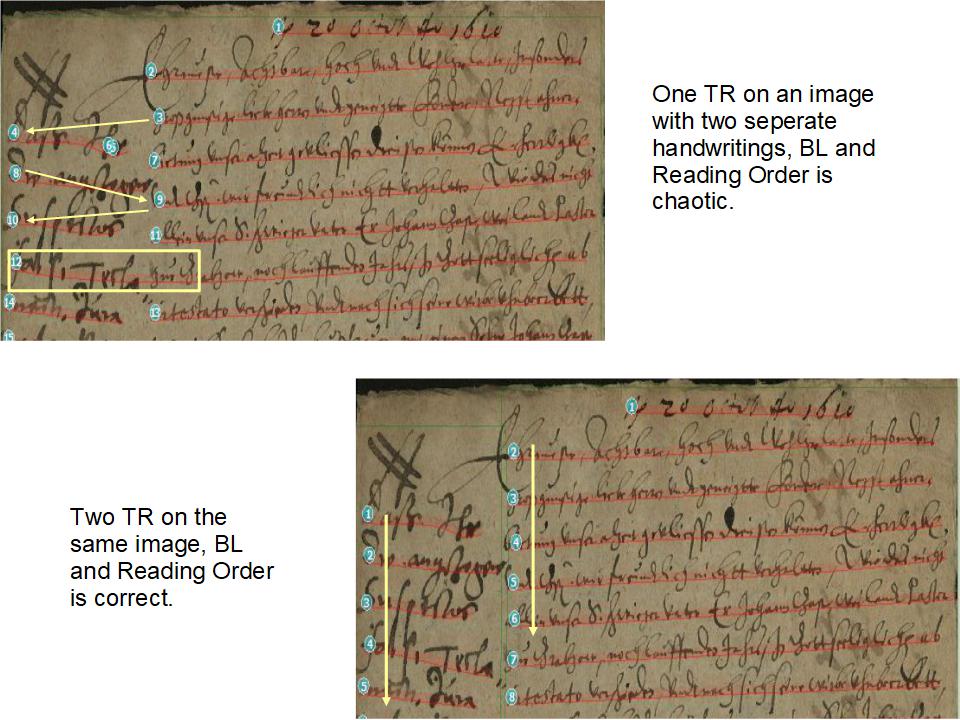
Be aware that when you split a shape Transkribus will automatically change the Reading Order. For example, if two TRs are made from one, a new reading order is started in each TR.

Posted by Anna Brandt on

Reading Order

Release 1.7.1

The Reading Order displays the order in which the HTR will read the lines in an image. This RO is created automatically during the layout analysis, but can also be changed manually later. With the automatic LA, the RO is determined by the coordinates of the lines in the image: the top line, which is furthest to the left, is number one, and so on.

If the writing in the image is not completely horizontal or if baselines are split, this can cause errors in the Reading Order. If you correct the LA, you should always look at the RO again, otherwise the transcribed text gets confused and makes little sense. To change the RO you can either click on the circles at the lines where the line numbers appear and correct them directly. Or you can change the RO by selecting the corresponding line in the layout tab and moving it with the mouse. If the later full text is to make sense at first glance, such corrections are essential. After all, the RO determines the context of the content. If the HTR-Result of the document is only to be used for a full text search and is not to be displayed in structured full text, the RO is less relevant.


Tips & Tools
If you want to move a line forward or backward, the numbers of the following lines will change automatically. Sometimes it is necessary to calculate a bit beforehand which number will be the correct one.
Very important: When the author writes an increasing line from left to right – which happens very, very often – and when the baseline is split on the LA, the second half of the split BL will have the smaller number. If you want to merge these baselines with the Merge Tool, you have to look at the RO first. If the RO is wrong, Transkribus will merge it with a loop according to their coordinates. This baseline can no longer be interpreted by the HTR.
Edit: This problem was solved with the version 1.8.0. The problem now only occurs with vertically recognized lines.

Posted by Anna Brandt on

Toolbar – the most important tools and how to use them #1

Release 1.7.1

Creating Layouts

This is how the toolbar looks like with a new image. After you have run the CITlab Advanced LA, the other tools will be enabled. If the layout is to be done manually, the two tools in the upper circles are particularly important. TR means text region. This is the first layout element that has to be created for a page. It defines which areas of the image have text and which do not. If the text does not fit correctly into a text region, you first roughly draw the TR and later adjust it. Then you can draw the baselines with “BL”. Among the lower tools, only the green, semicircular arrow is important. This is the “undo”-function; as the name suggests, it is used to undo actions.

Tips & Tools
“Item visibility” is a function that makes structure of the document more transparent for you. If it is enabled, a box appears in which you can select what items should be visible in the current image. Textregions and Baselines are the most important elements, not only while editing the layout, but also during the later transcription. These two boxes are always checked in the default setting. If the display of the Baselines annoys you, you should deactivate it manually. Another important feature for correcting the layout is the Lines Reading Order, i.e. the order in which the lines are read later by the HTR. When the Reading Order is displayed, you can easily see whether the layout analysis has worked reliably. However, this display is mostly distracting while transcribing. In this case you should hide it again.

Posted by Anna Brandt on

Baselines

Release 1.7.1

The Baseline is the most important reference point for text recognition. The segmentation of a text into lines can in most cases be done automatically with the help of CITlab Advanced LA. However, there might be cases where you either immediately decide to draw the baselines manually or at least want to make manual corrections. Here are a few practical tips:
The baseline should always be positioned exactly under the “middle band” of the line, i.e. where “a” “o” “m” “v” etc. touch the base.
If you add the baseline manually which you can do very quickly with a little practice, you should never move too far from the bottom of the characters (not further than one or two linewidths of the writing) no matter in which direction. The baseline consists of individual points that you set yourself when adding manually; the setting is completed with a double-click or Enter on the last point. Baselines can also be drawn vertically. In an image and even a text region, you can also combine different line directions (e.g. the typical “postcard layout”).

Problems with automatic line detection occur frequently when either the word spacing varies significantly or becomes particularly large, or if the line orientation is changed (curved lines). In such cases, the Baseline may be split into subsections containing individual words. This has no consequences for the text recognition and thus for the later full text search, because the entire text can still be captured. However, those who value a perfect layout of their full text that reflects the original text must correct this. The correction of the Baselines is not always necessary, but you have to pay attention to the Reading Order, otherwise uncertainties may arise in the later transcript. Such “torn” Baselines can be merged again easily with the Merge-Tool.


Tips & Tools
What if the text is upside down?
The CITlab Advanced LA cannot correctly capture the Baseline of an upside down line. Baselines always work in the reading direction. If you want to detect upside-down lines or set them manually, you either have to rotate the image or draw the Baseline at the top of the middle band (against the reading direction) from right to left. In both cases, Transkribus will rotate the image during transcription in the readable direction.

Posted by Anna Brandt on

What you should know about Collections & Documents

Release 1.7.1

Collections and Documents are the two most important categories in which you can organize and manage material in Transkribus. A Collection is nothing else than a kind of directory in which you store Documents that belong together. It is important to know that some tools that Transkribus provides do not work beyond the boundaries of a Collection. This includes a tag search, which is an important tool for those who want to tag their HTR results.
Documents are parts of the Collection, e.g. a bundle of letters or a record or even
a single piece of writing. In our project a Document is always a record. Documents can therefore contain many pages. They usually are uploaded into Transkribus via private FTP or directly from a local folder. You cannot upload single images, but only images that are contained in a folder.

Once uploaded, the possibility to edit the individual pages of a Document is limited. Using the document manager, you can move or delete individual pages within the Document, you can even add more pages. However, once images are uploaded, they can no longer be edited or rotated. This means: before uploading you should check if the images are aligned correctly and if the Document is complete.
Thus in our project, Documents are only compiled and uploaded once they have been edited in the Goobi metadata editor, checked for completeness and received structure and metadata. This ensures that when the HTR results are re-imported to Goobi later, they are actually transferred to an identical document structure.


Tips & Tools
Documents can be distributed between different Collections at any time. This is done by linking or duplicating. In the first scenario, each change to the Document, no matter in which Collection it is made, is transferred to all Collections it is linked to. The second scenario creates actually two unique Documents that can also be edited independently of each other.

Posted by Anna Brandt on

Textregions

Release 1.7.1

Usually, the automatic CITlab Advanced Layout Analysis in its standard setting will recognize a single Text Region (TR) on an image with the corresponding baselines.
However, there are also simple layouts where the use of several TRs is recommended, e.g. if there are marginal notes or footnotes and similar recurring elements. As long as these text areas, which differ in content and structure, are contained in a single TR, the layout analysis simply counts the lines from top to bottom.

This “Reading Order” does not take into account where a text actually belongs in terms of content (e.g. an insertion), but only where it is graphically located on the page. Correcting an automatically generated but unsatisfactory Reading Order is boring and often time-consuming. The problem can easily be avoided by creating several text regions in which the related texts and lines are well kept like in a box.
To do this, you create the TRs manually at the appropriate places. Afterwards start the line detection with CITlab Advanced to add the baselines automatically.

Tips & Tools
If you have drawn the TRs manually and want to have the baselines drawn automatically by CITlab Advanced LA, you should first uncheck the box “Find Textregions”. Otherwise the manually drawn TRs will be replaced immediately. You should also make sure that none of the individual text regions is activated, otherwise only these will be edited.

Posted by Elisabeth Heigl on

transcription guidelines

In the transcripts for the Ground Truth, the litteral or diplomatic transcription is used. This means that we do not regulate the characters in the transcription, if possible. The machine must learn from a transcription that is as accurate as possible so that it can later reproduce exactly what is written on the sheet. For example, we consequently adopt the vocal and consonant use of “u” and “v” of the original. You can get used to the “Vrtheill” (sentence) and the “Vniuersitet” (university) quite quickly.

We made only the following exceptions from the literal transcription and regulated characters. The handling of abbreviations is dealt with separately.

We cannot literally transcribe the so-called “long-s” (“ſ”) and the “final-s” because we are dependent on the antiqua sign system. Therefore we transfer both forms as “s”.

We reproduce umlauts as they appear. Diacritical signs are adopted, unless the modern sign system does not allow this; as in the case of the “a” with ‘diacritical e’, which becomes the “ä”. Diphthongs are replaced, for example the “æ″ becomes “ae″.

The Ypsilon is written in many manuscripts as “ÿ″. However, we usually transcribe it as a simple “y″. In clear cases, we differentiate between “y” and the similarly used “ij” in the transcription.

There are also some exceptions to the literal transcription with regard to the punctuation and special characters: In the manuscripts, brackets are represented in very different ways. But here we use the modern brackets (…) uniformly. The hyphenation at the end of the lines is indicated by different characters. We transcribe them exclusively with a “¬”. The common linkage sign in modern use – the hyphen – hardly occurs in the manuscripts. Instead, when two words are linked, we often find the “=”, which we reproduce with a simple hyphen.

We take the comma and point setting as it appears – if it exists at all. If the sentence does not end with a dot, we do not set a dot.

Upper and lower case will be adopted unchanged according to the original. However, it is not always possible to strictly distinguish between upper and lower case letters. This applies to a large extent to the D/d, the V/v and also the Z/z, regardless of the writer. In case of doubt, we compare the letter in question with its usual appearance in the text. In composites, capital letters can occur within a word – they are also transcribed accurately according to the original.

Posted by Elisabeth Heigl on

Use case Spruchakten

The surfaces of file-sheets from the early modern times are usually uneven. Therefore, we always use a scanning glass-plate. Thus, at least rough foldings and creases can be smoothed and the writing can be straightened a little.

Contrary to the usual scanning procedure of books, we scan each page of a file individually. Thus, we deliberately excluded the possibilities of a subsequent layout processing of scans. Earlier digitization projects have shown that such post-scan layout editing can be laborious, error-prone and easily disrupt the workflow. But because subsequent layout processing was ruled out, the scans have to be produced as presentable as possible right from the start.

This is why we use the so-called “Crop Mode” (UCC project settings) for scanning. This automatically captures the sheet edge of the original and sets it as the frame of the scanned image. The result is an image with barely a black border. A possible misalignment of the sheet can automatically be compensated up to 40°. This leads to images that are reliably aligned and it also makes it easier to change pages during scanning.

For the “Crop Mode” to recognize a page and to scan it as such, only this page must be visible. This means that everything else, both the opposite side and the pages beneath, must be covered in black. For this purpose we use two common black photo cardboard sheets (A3 or A2).

In the Spruchakten there are often paper-sheets in which the lock-seals have been removed by cutting out. These pages must be additionally underlaid with a sheet as close as possible to the original colour. The “Crop Mode” will then complete the border so that no parts of the sheet are cut off during the scan.

Thus, during the scanning of the Spruchakten, we cannot simply “browse” and trigger scans, basically we have to prepare every single image. The average scanning speed with this procedure is 100 pages per hour. This way, we also save a possible costly post-processing of the images.

Posted by Dirk Alvermann on

Ground Truth is the Alpha and Omega

Release 1.7.1

Ground Truth (GT) is the basis for the creation of HTR models. It is simply a typewritten copy of the historical manuscript, a classic literal or diplomatic transcription that is 100% correct – plainly “Groundt Truth”.

Any mistake in this training material will cause “the machine” to learn – among many correct things – something wrong. That’s why quality management is so important when creating GT. But don’t panic, not every mistake in the GT has devastating consequences. It simply must not be repeated too often; otherwise it becomes “chronic” for the model.

In order to ensure the quality of the GT within our project, we have set up a few fixed transcription guidelines, as you know them from edition projects. It is worthwhile to strive for a literal, character-accurate transcription. Regulations of any kind must be avoided; e.g. normalizations, such as the vocal or consonant usage of “u” and “v” or the encoding of complex abbreviations.

If the material contains only one or two different handwritings, about 100 pages of transcribed text are sufficient for a first training session. This creates a basic model that can be used for further work. In our experience, the number of languages used in the text is irrelevant, since the HTR models usually work without dictionaries.

In addition to conventional transcription, Ground Truth can also be created semi-automatically. Transkribus offers a special tool – Text2Image – which is presented in another post.

Posted by Elisabeth Heigl on

How to transcribe – Basic Decisions

In Transkribus, we create transcripts primarily to produce training material for our HTR-models; the so called „Ground Truth“. There are already a number of recommendations in the How-to’s for simple and advanced requirements.

We do not intend to create a critical edition. Nonetheless, we need some sort of guidelines, especially if we want to be successful in a team where several transcribers work on the same texts. Unlike classical edition guidelines, ours are not based on the needs of the scholarly reader. Instead, we focus on the needs of the ‘machine’ and the usability of the HTR result for a future full text search. We are well aware that this can only lead to a compromise in the result.

The training material should help the machine to recognize what we see as well. So it has to be accurate and not falsified by interpretation. This is the only way the machine can learn to read in the ‘right’ way. This principle is the priority and a kind of guideline for all our further decisions regarding transcriptions.

Many questions that are familiar to us from edition projects must also be decided here. In our project we generally use the literal or diplomatic transcription, meaning that we transcribe the characters exactly as we see them. This applies to the entire range of letters and punctuation marks. To give just an example: we don´t regulate the consonantal and vocal usage of the letters “v” and “u”. If the writer meant “und” (and) but wrote “vnndt”, we take it as literal and transcribe as the latter.

The perfection of the training data has a high priority for us. But there are also some other considerations influencing the creation of the GT. We would like to make the HTR results accessible via a full-text search. This means that a user must first phrase a word he is searching before receiving an answer. Since certain characters of the Kurrents font, such as the long „ſ“ (s) will hardly be part of a search term, we do regulate the transcription in such and similar cases.

In the case of sentence characters – using a certain amount of leeway here – we only regulate some. We regulate the bracket character for example, which is represented quite differently in the manuscripts. The same applies to word separators at the end of a line.

The usual “[…]” is never used for illegible passages. Instead this text area is tagged as “unclear”.